


Instruction. How to set up an iPv6 sproxyy server on Windows in 30 seconds.
The ipv6 sproxyy protocol is considered an improved version of the ipv4 protocol with superior encryption that provides maximum protection for Internet users’ personal information. This type of protocol has many undeniable advantages:
- Even with a static IP, you can get a dynamic address.
- You achieve high connection speeds and significant savings in data traffic due to data buffering.
- Costs are reasonable due to the large number of free IP addresses.
- High level of data protection.
- Guaranteed bypass of any portal blocking.
sproxyy ipv6 is essential for SEO optimization, promotion of goods and services on social networks, surfing the web. The only problem is that many popular Russian social networks and websites are not yet compatible with version 6, but the transition to this version in the future is inevitable. We’d like to point out a step-by-step guide to configuring ipv6 and disabling sproxyies on Windows.
Get a separate IPv6 sproxyy server for each target
Setting up an ipv6 sproxyy server on Windows
First check if your connection type supports this sproxyy protocol – this is especially important if you are using the paid version. Go to the Network and Sharing Center, open the “Connections” tab and look for the “Connection protocol version 6” option in “Properties.”
sproxyy configuration on Windows operating systems looks like this:
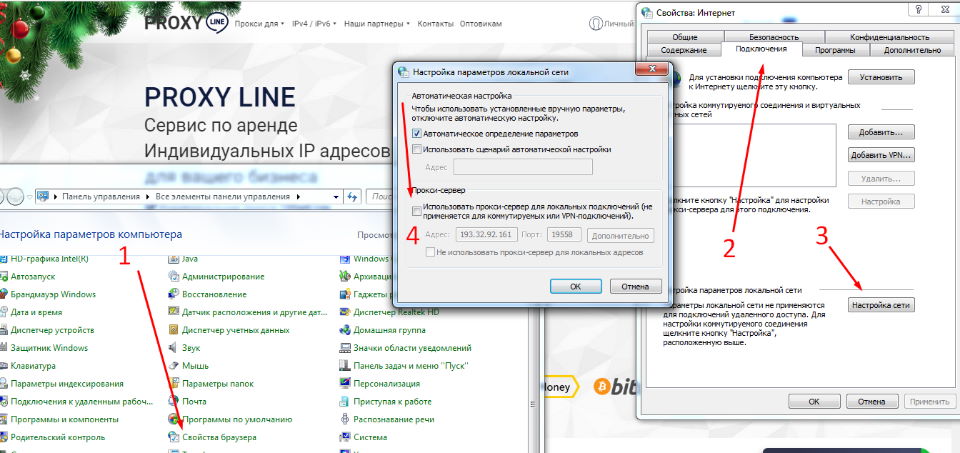
- Open the “Control Panel” and go to the “Internet Explorer Properties” section.
- The “Internet Properties” window will open. You can also access this section in another way: Press the Windows key and the “R” key at the same time. In the box that appears, type inetcpl.cpl.
- Go to the “Connections” tab and click “Network Settings.” Sometimes this is also called “Local network settings.”
- Allow local connections via sproxyy by checking the appropriate options.
- Enter the IP address and working port of the server you are using in the mandatory fields. If necessary, you can set specific parameters for the sproxyy server or select the “One sproxyy server for all protocols” function by checking the appropriate line in the “Advanced” section.
- Click the OK button to save your changes.
The same instructions apply to activating a single sproxyy server in any version of Windows. Note: If you have a list of websites that do not require a private IP address, enter the addresses separated by semicolons in the “Do not use sproxyy…” line.
If necessary, you can change the sproxyy settings in the same way – for example, if you decide to use a different IP address or if the list of addresses for which you don’t need to use a sproxyy is expanded. Don’t forget to confirm all the performed steps by clicking “OK”.
Disabling ipv6 sproxyy on Windows
To stop using a private sproxyy on your operating system, follow the instructions above, go back to Internet Properties and select the Connections tab. Then find the section for dial-up and VPN connections. Specify the type of connection you want to use in the future, and then open “Network Settings.” Deactivate the sproxyy for this connection by unchecking the appropriate option and clicking OK. This way you can get back to work or to the Internet.
Disabling the sproxyy is not a personal whim of the user, but becomes necessary when the selected server is not satisfactory. To avoid problems when using a sproxyy server, we recommend buying a proven paid IP with extensive features, high reliability and stable download speeds.
